Find answers to your questions here.
Search:
Filter by system:
Filter by category:
Install the latest HASP Driver. You can find it in the ATAS MetStar release folder. Download it and install it. It may take a minute or two for the key to recognize the driver. Removing the key for a few seconds and reinserting it may facilitate a speedier update after the driver has been installed.
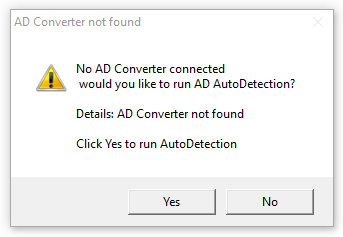
There could be a number of reasons for not being able to connect to an AD-converter. Did you just install a new computer? In that case, the most likely cause is the driver.
1. Please check that the AD-converter is visible; open the device manager and under “Ports” you should be able to see it without any error. It could say something like USB-to Serial or COM-K depending on which AD-converter you are using.
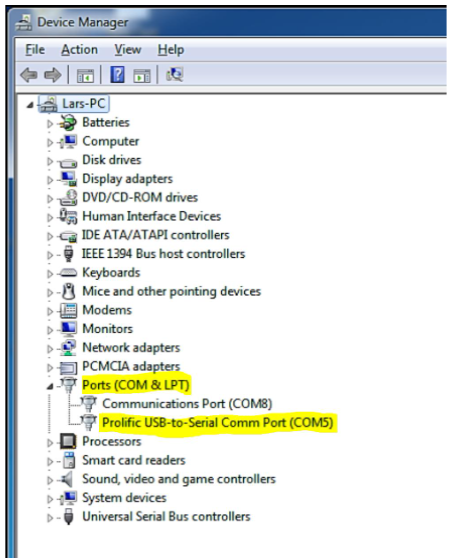
If you see a device in there that has an error instead, it’s likely that the driver is not installed correctly.
2. Please consider going through our manual from page 180 for troubleshooting the AD-converter.
3. If your issue persists, please open the support module in the menu and send us the ID and password and we can have a look.
If you are an active user of any of our programs, you can get remote support via TeamViewer. The support client is accessible in all programs, but if you are unable to access or find it, click here to download (disclaimer).
For database storage, we use PostgreSQL. When placing it on a server, the requirements of the hardware for the database itself are not that great, but will depend on other simultaneous usages of the server. We set some minimums for a decent user experience.
OS: Windows 7 SP1, Windows Server 2012 or later. 32 or 64-bit.
RAM: 2GB or more.
Harddrive: ATAS MetStar samples will take up roughly 0.5GB for every 100 000 samples. With an annual sampling of 50 000 cups, 1GB could be reached in 2 years for the data itself. Spectrometer samples would take up roughly 50MB for 100 000 samples. Processes from ATAS MetPro are more difficult to average, but 100 000 should fit within 10GB. Corrections/charges from MetalMaster/ATAS MetPro would take up 1GB for 100 000. Count on 0.5 GB for the installation. If you keep backups on the server as well, 50GB would suffice. If running an ATAS data-collecting software etc. directly on server, there is an additional requirement of having .NET FrameWork 4.6 installed.
• Processor: Preferably an Intel Core i-series or similar*
• Operating System: Minimum requirement Windows 7 SP1, 64-bit. Recommended Windows 10.
• RAM Memory: 2Gb is a minimum. When reviewing larger amounts of historical data, more RAM will come in handy.
• Screen resolution: 1024 * 768 is an absolute minimum.
• Hard drive: For installation, 1GB free space. 100000 charges/corrections should fit well within 1GB. Also figure in additional storage for backups.
*because there are many variants of processors, we recommend to check the list and check the pass mark. CPU Benchmark of your process and make sure it has a mark of 1500+ http://www.cpubenchmark.net
• Processor: Preferably an Intel Core i-series or similar*
• Operating System: Minimum requirement Windows 7 SP1. Recommended Windows 10 64-bit(support for 32-bit ending)
• RAM Memory: 2Gb is an absolute minimum. Recommended, at least 4Gb. When viewing larger amounts of data, more RAM will come in handy.
• Screen resolution: 1024 * 768 is an absolute minimum.
• Hard drive: For installation, 1GB free space. 100000 samples will require 0.5GB where storing samples. Also figure in additional storage for backups.
• USB ports: For production, 2 free USB-ports are required for the HASP-key and AD-converter. Preferably plug the AD-converter directly into the computer. If a USB-hub is used, it has to have an external power source.
*because there are many variants of processors, we recommend to check the list and check the pass mark. CPU Benchmark of your process and make sure it has a mark of 1500+ http://www.cpubenchmark.net
The rule is “the fewer the elements the shorter the time”. If you compare FVM (which is used in NovaFlow&Solid and NovaOne) with FDM you should aim for a similar number of elements in the wall thickness, which for FDM should be 3 elements. If you apply three elements in FDM you get a very rough simulation but with FVM it is enough and the calculation time is really short. You can also use our dual meshing method that enables use of different mesh resolution for mold filling and solidification. This really shortens the simulation time as well.
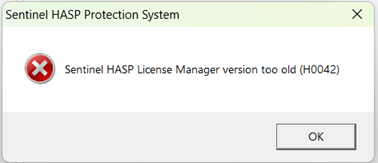
It means that the HASP key is not activated for this version. Contact support@novacast.se for activation.
The installation was incomplete. To fully install NovaFlow&Solid or NovaOne, you need to manually run the MFC files in the subfolder “mfc80” and also the two SQL files in subfolder “SQL_compact”.
The HASP key is a USB stick that contains your license file and works as your software key.
The HASP key needs to be activated when a new version is released or when a new license is issued. Please contact our support team for assistance.
GGI (Good Guys’ Index) is an improved variant of looking at yield improvement and weight savings. The purpose of the GGI program is to visualize the weight, energy and environmental savings you can do in your process. It measures each variant of casting setup and there you see the differences between them and the savings. Our recommendations are to use GGI for continuous improvements of your castings.
You can either slightly change one of the existing materials or you can through us purchase Jmatpro data, which is theoretically calculated data. However the database is quite comprehensive already from the start with most EN and ASTM standard alloys.
Yes, press F1 to go to the HTML Help, or choose it in the menu. Here you find topics for all parts of the software and you can also search in the help function.
This works automatically in NovaFlow&Solid/NovaOne and it comes with no extra cost in NovaFlow&Solid and you can use unlimited amount of cores. In NovaOne if you want to use 1 core or 2 or 4 it is free but additional core support is available and can be purchased.
The quality of the signal from the cupstands depends on a number of factors. Mainly, these fall into two categories. The cable and the environment. The factors of the cable can be divided into the length itself, where too long of a cable will impact the signal, and the quality of it. The quality of it relates to such things as whether it’s shielded or not and how carefully it has been manufactured. How much does the diameter of the wires vary over the length of the cable versus the specification? How close is the chemical composition of the cable to the specification? The effect of the surrounding environment is mainly due to fields created by other equipment.
If you purchase your cable from NovaCast, you can be sure to receive a high quality shielded cable, so those factors are not a worry. However, we cannot control the environment. Therefore, it’s difficult to give an upper value for the maximum length of the cable. We generally recommend to stay below 100 meters. With our high quality cable, if it is 100 meters or less, we can generally say that it will perform well in most environments. We do however see some instances where a longer cable is used without problem. But we cannot guarantee it, as we cannot control all the factors.
The system cannot connect to the database, is the definition in settings made correct? Please check the Settings and press the Database button. Insert the correct name of the database, Login role (default postgres) and the password (default ncstar).
Is the advice correctly saved in Process Editor? The advice must also be connected to the alloy in Alloy editor. Open the Alloy editor press on the user defined Equations tab. Chose the correct alloy to the left on the screen. Select the correct advice in the drop down menu in user rules. Save all and double check that the alloy now is connected to the correct advice/rule
Every time you have made changes in the Alloy editor you have to press the ‘Save all’ button to save the changes back to the database.
When you have entered all chemical information you have to push on the button with a small arrow positioned between the tables with significant parameter information.
It is important to use the correct decimal separator as determined by the localization on your computer. For some cultures, it’s a comma ‘,’ and for some it’s a period ‘.’. Please check you localization setting on your operating system.
The results are out of magnification. Make a refreshment of the view by ‘view all’.
The power to the measuring unit is unstable. The best thing is to have an UPS before the measuring unit in order to stabilize the power. If you do not have any UPS, change the power supply by changing the connection to the power outlet. The compensation cables to the sampling stands are to close to a strong magnetic field. Change the position of the cables.
Please check the filter to make sure you have not filtered them out. The system has an automatic detection of bad samples. The bad samples could be studied by inactivating this function in the filter menu.
Start to check that the measuring unit is connected to the power net. If not, connect. Open the measuring unit. Do the lights work on the electrical components? If OK, Is the communication cable between the measuring unit and the computer connected correct?
If everything is OK restart the system. If the system does not connect anyway, change the communication cable and make a restart. There is a more extensive trouble-shooting guide we could provide you. If still not working send us a support request.
We recommend to add Graphite, SiC or a conditioner (low range inoculation alloy). The melt needs to be enriched with nucleation sites. Attention, one reason could also be trace elements that segregate to the last solidified volumes. Double-check your information from your spectrometer.
If this is a new setup, the most common cause is a typo during the entering of database names, users and passwords. Note that passwords, user names and database names are case sensitive and it can be difficult to detect some small typos. Go back and open up pgadmin and make sure that what you named your database and user are exactly the same as in the settings of ATAS MetStar. Retype them even, just to be sure. If you are connecting to PostgreSQL on a server, make sure that the pg_hba.conf is configured to allow more than local access. Check the guide for more information on this. Also, make sure that your firewall on the server is not blocking the incoming connection. Your IT-guy should be able to help you with this. If you are using windows firewall, the guide shows you how you can do it but you may want to consult your IT-guy anyhow. He probably needs to grant you access to play with the firewall anyways.
One possibility is that the temperature of the melt is not sufficient. This depends a little bit on what type of alloy it is, but if you know the temperature to be very low when it reaches the cup, try decreasing the walking distance between where the sample is fetched and the sampling station and either use a ceramic spoon and/or preheat your spoon sufficiently when you fetch the melt. Another possibility is that you don’t have an alloy selected. In the top left quadrant of the channel, you should be able to see which alloy you have selected. If it instead says ‘Select Alloy’ in red, you need to select an alloy. Why wasn’t an alloy selected? This could be because settings were set to select an alloy at startup that no longer exists or more rarely it could have been cause by a corruption of the settings. Most commonly, this happens because you don’t have a connection to your database.
If you go to Menu -> Settings -> Engineering Unit you will find at the bottom a setting that you can tick on and off called ‘Evaluate current sample’. To understand what it does, let us first consider the curve viewer that lists the samples. In here, you can see values from TL and TELow and whatever other parameters you have chosen to view in the settings. All these values are not evaluated on the fly but they are the calculated values that are stored in the database. When you make changes to the alloy settings parameters and coefficients, it’s going to affect the way that sample is evaluated. But if you make changes to an alloy, it’s not going to affect the values in the curve viewer until you actually re-evaluate the samples and store the results back into the database. If you don’t have the ‘Re-evaluate current sample’ ticked, then when you select a sample and click on ‘Details’, you will also in this window see the values as they were stored in the database. If you have made some changes in the alloy however and you would like to see what effect it has on your sample, tick the ‘Re-evalute current sample’-setting and then select the sample and click on ‘Details’ again. Now you will see what the sample looks like re-evaluated reflecting the changes to the alloy. It will not store the values back to the database however. It’s just there for you to be able to test what effect changes to an alloy could have. Then when you are ready to re-evaluate and store the changes back to the database, select the samples in the curve viewer and right-click and choose ‘Re-evaluate samples’.
The blue and white stripes are intentionally markedly different from the normal curve areas. Normally, the first part of the curve, before anything interesting happens, is green and the last part, after all the exothermic events have taken place, is gray. In between there, we have areas that represent different phases of the cooling that in MetStar are called S1, S2 and S3 respectively. The coloring of the areas below the curve is a way to give quick graphical information about the curve so that it can be compared with other similar curves. After some practice comparing curves graphically, you can extract some general information about the status of the melt, just by glancing the cooling curve. Perhaps most notably, the S2 area is always orange and the S3 area is always red, if they exist. But the color of S1 depends on the solidification morphology. S1 is the area between TL and TELow and if it is yellow, it’s hypoeutectic. If it’s black, it’s hypereutectic. If it’s missing, it’s because TL and TELow are the same and the sample is eutectic. So why the blue and white stripes? They are there to mark that something is missing. Most commonly, we were not able to calculate TEHigh, most likely because there is no such point on the cooling curve to find, perhaps because the solidification was white. The blue and white stripes are there so that you do not extract any other information than that something is missing from the sample.
First of all, it’s only calculated for grey cup samples. The next thing is that it is quite a complicated calculation and it needs quite a bit of information from the curve in order for it to be able to calculate. First of all, all key temperatures have to have been found. The key temperatures are such as TL, TELow, TEHigh and TS. Most notably, however, we need to have enough curve before TL in order to be able to calculate the zero curve. What this means is that if you have a low pouring temperature, i.e. not enough above TL, we cannot calculate the zero curve and we will not be able to estimate the graphite precipitation.
On our systems, we create a user called ‘user’ with the password ‘user’ and one administrator called ‘admin’ with the password ‘nc123’. Sometimes, the IT-department at the foundry will create domain users or other users with different passwords. In those cases you will have to ask them. For our settings, the default password is ‘ncstar’. For the password to your database, we would normally use ‘ncstar’ unless a different password is requested or someone within your company creates a password during the setup.
This indicates that the positive and negative wires have been mixed up somewhere in the system. Has a cable been replaced recently? For type K compensation cable, the green cable is positive and the white cable is negative. For more questions on the connections to your AD-converter, please contact us.
This condition suggests that there is a short in the system and it’s measuring the temperature of the location of the short. Normally, the cup closes the circuit and the temperature is measured in the cup. But, when the cup is not on and it’s reading a room temperature, it must be closed somewhere else. If this is a new installation, or a re-wiring, check the wiring first. If the issue started on a previously functioning system that has not been tampered with recently, it’s most likely due to a damage to the compensation cable. Was melt accidentally poured on to the cable somewhere? Was there any other construction, or similar, that could have damaged the cable anywhere along the way? If you have a system with male and female connectors, such as connectors outside a Measuring Box or Production Unit, try closing the circuit at each point to determine where in the system the error is to be found.
The reason is that ACEL is calculated as soon as it can be. If you are using the default parameters for coefficients, this means that ACEL can be calculated directly after TL is calculated for a hypoeutectic sample, as MetStar has all the information necessary to calculate it at this point. For a hypereutectic sample, we also need to know the value of TELow before we can calculate ACEL. If the default coefficients are not used, there are other factors that play in as well. If you are unsure, contact us.
The reason is because the results overview is completely customization and by not having a default, we encourage you to think through which parameters are important to you and that you want you or your operators to see. Open the menu bar on the right-hand side and click on Settings -> Production Unit and under Results Overview you can choose which parameters you would like to see for each alloy type.
Find a suitable place for the production and the viewer unit. Inside a shop floor operator room or similar is preferable.
The next thing is to have an outlet nearby to plug the unit in to. The unit comes with a regular 230V/50Hz 3-prong grounded power cable that fits the standard U.K. outlet. Also, prepare a LAN-cable of Cat5e or higher standard connected to your network that is no longer than 100 meters. It can be directly plugged in to the unit on the outside of it once it has been installed.
Lastly, you could start preparing for the compensation cable and where it needs to be drawn. This could include deciding where the cupstands will be placed and measuring out lengths, drilling holes and laying down pipes.